Showing posts with label crafts. Show all posts

Wednesday, September 19, 2018

Explore the Kaleidoscope Embossing Technique!


Explore the Kaleidoscope Embossing Technique! 

This easy inky technique will help you create realistic images that resemble a dimensional painting!


Same technique for both cards but the card below also includes the textured Baked Texture Embossing Powders...and different Impression Obsession stamps for a slightly different background.


Cats in a Row Cards

Supplies:

Impression Obsession Rubber Stamps 
E7983 Black Cats 
3160-LG Twinchies 4
G7762 Leafy Branches

Clearsnap
Colorbox®️ Petal Point Classic Pigment Inkpad (Arboretum, Metallic)
Colorbox®️ Embossing Powder (Clear)
Top Boss®️ Embossing Stamp pad
Colorbox®️ Archival Dye ink pads: Mudslide, Saddle, Seattle Sky, Putty, Wicked Black
Art Daubers

Beacon Adhesives
Zip Dry®️ Paper Glue

Emerald Creek

Baked Texture Embossing Powders by The Altered Page (Dirty Sand, Ancient Amber, Rocky Road, Chunky Rust)

Heat tool
White, tan and brown cardstock


Instructions:


Version 1
  1. Remove desired color sections from the Petal Point ink pads. Using the tip of each section, apply ink directly to the Black Cats stamp, blending as desired. 
  2. Stamp image onto 3” x 6 1/4” white cardstock. Pour clear embossing powder over image, tap off excess. Heat until melted.
  3. Apply Putty around edges direct-to-paper (DTP) by angling inkpad and pressing repeatedly off the edge in a random pattern. 
  4. Using an Art Dauber, apply Saddle around the edges of the card. Place the short card edge onto the Mudslide inkpad. Angle slightly and quickly pull the card edge across the inkpad. Repeat for all 4 edges.  
  5. Trim, score and fold tan cardstock to create a 4 1/4” x 7 1/2” notecard. Stamp Leafy Branches in a random pattern around the front of the card.
  6. Using Zip Dry Paper Glue, attach layers.
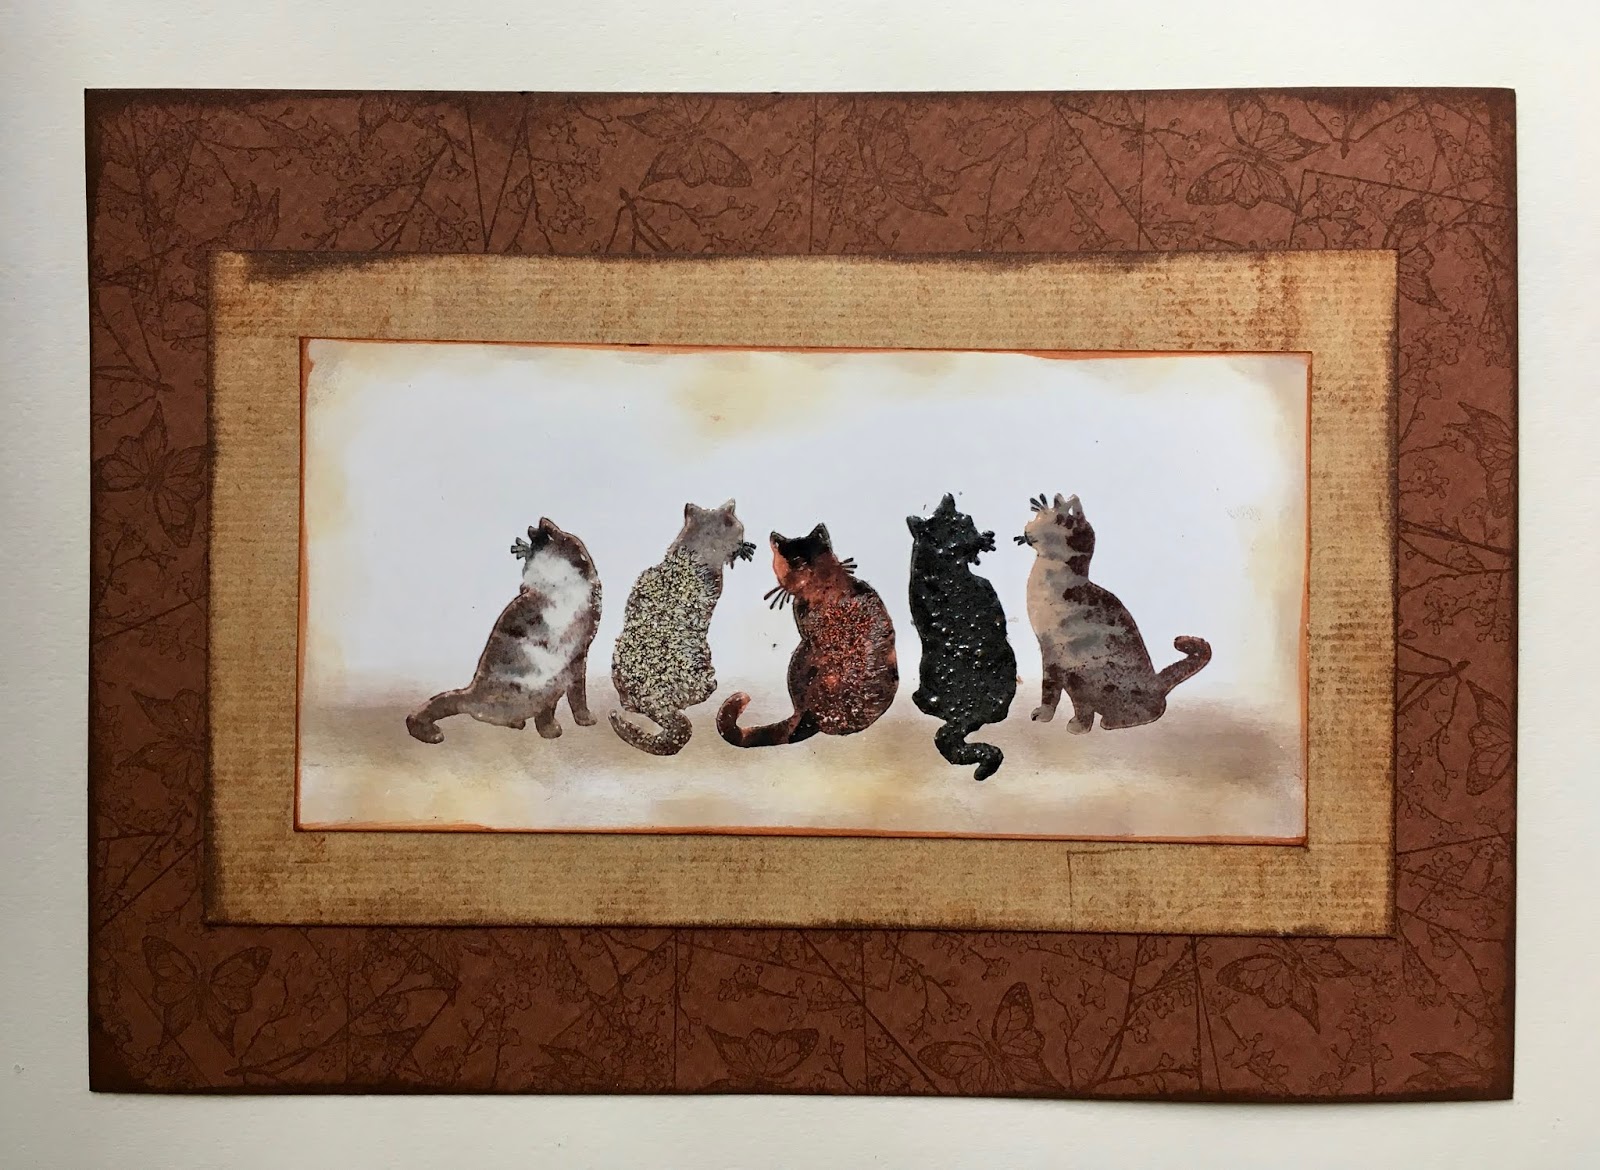


Version 2 (with Baked Texture Embossing Powders added)
  1. Remove desired color sections from the Petal Point ink pads. Using the tip of each section, apply ink directly to the Black Cats stamp, blending as desired. 
  2. Stamp image onto 3” x 6” white cardstock. Carefully pour on the Baked Powder colors and textures in sections of your choice.  Carefully tap off excess powder. (Note: Less is more!) Pour clear embossing powder over remaining sections of the image, tap off excess. Heat until melted.
  3. Using an Art Dauber, apply Putty and Seattle Sky across the bottom edge of the card, as shown. Add Putty and Seattle Sky lightly around the edges, as well. 
  4. Place the short card edge onto the Saddle inkpad. Angle slightly and quickly pull the card edge across the inkpad. Repeat for all 4 edges.  Repeat this step to apply Mudslide around the edges.  
  5. Apply Saddle to 4” x 7” tan cardstock direct-to-paper (DTP) by wiping inkpad across. Add Mudslide and Wicked Black to edges using the DTP method in step #4
  6. Trim, score and fold brown cardstock to create a 4 1/4” x 7 1/2” notecard. Using Wicked Black, stamp Twinchies 4 butterfly images in a random pattern around the front of the card.
  7. Attach layers to notecard with Zip Dry Paper Glue.

Thursday, July 12, 2018

Etched Glass Necklace


Etched Glass Necklace

Transform a simple microscope slide into a beautiful necklace pendant!


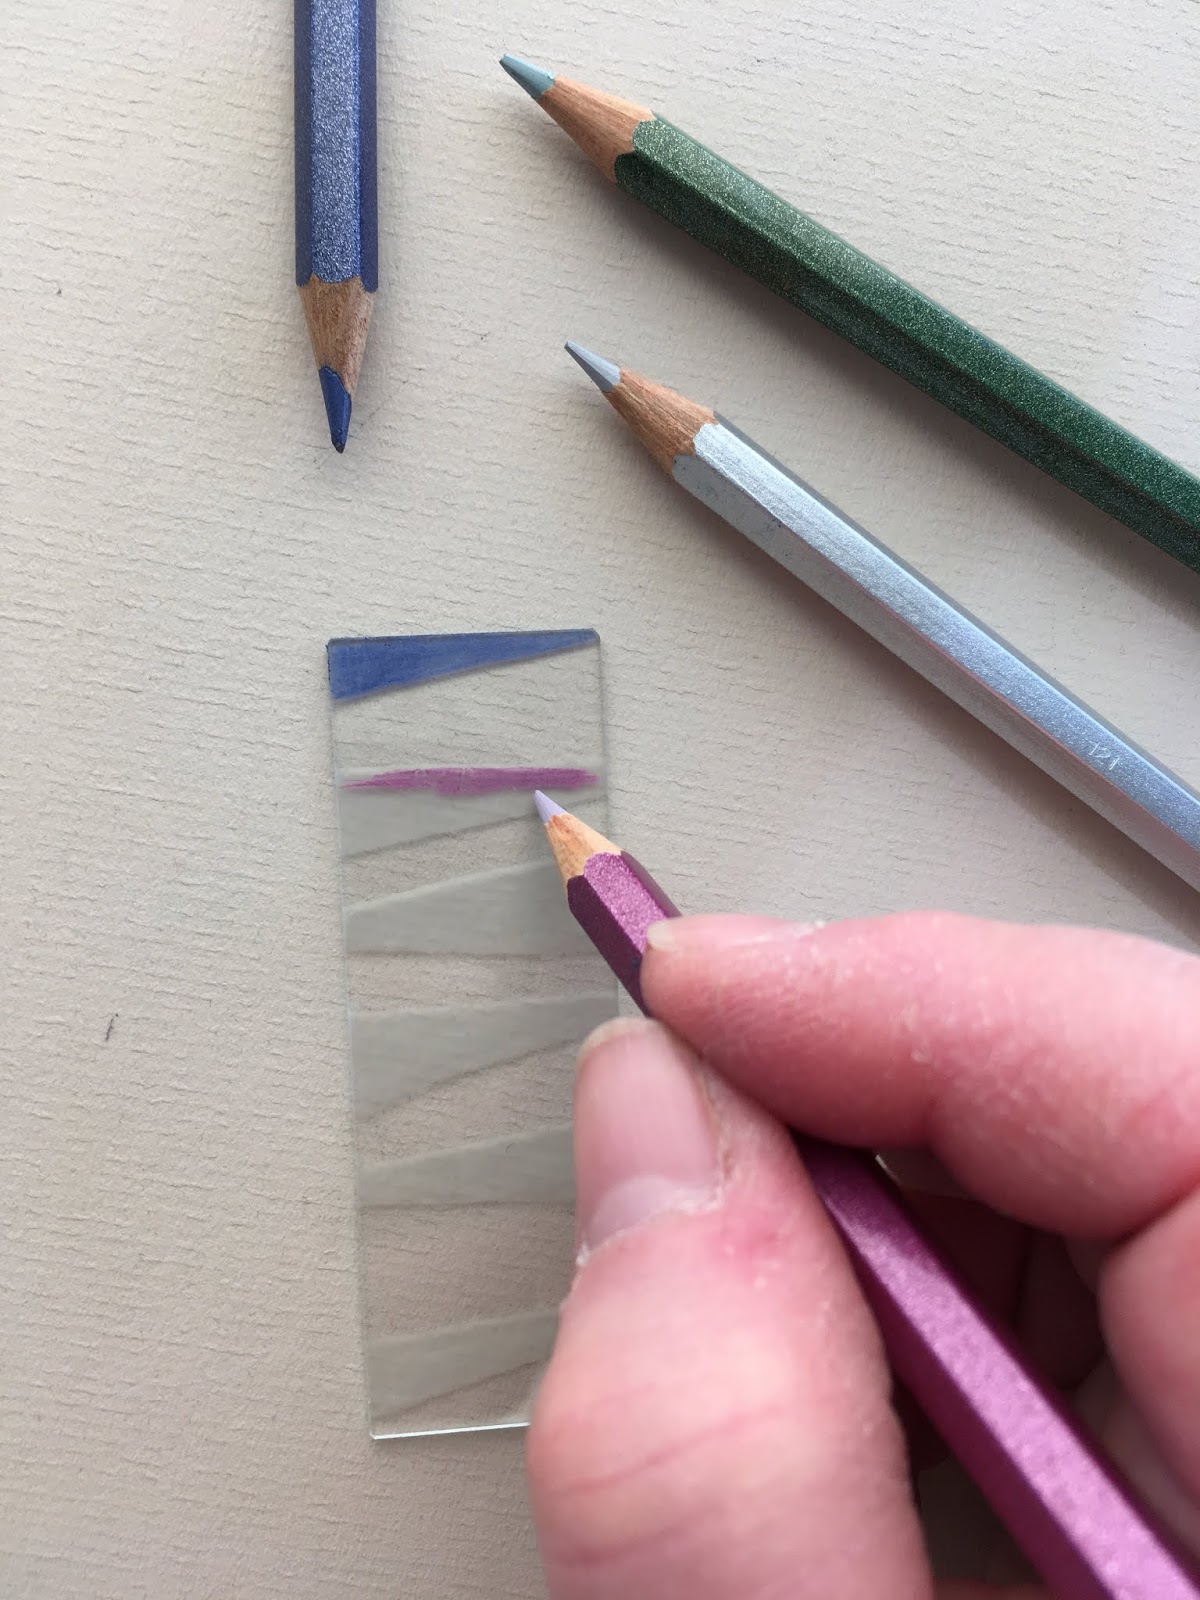
Etching glass changes more than just turning a transparent material into a translucent one.  It also changes the surface texture to become receptive for a variety coloring mediums. While this pendant can also be an outstanding statement in simplicity, you can also go one step further to jazz it up a notch by adding pops of color with metallic pencils.


You will need:

etchall Etching Creme and squeegee
Plastic container of water
Clean dry paper towels
2 glass microscope slides
Plastic shipping tape
Metallic colored pencils in colors of your choice
Felt, leather or other backing material of your choice.
Adhesive for glass that dries clear 
Cord in the length of your choice


Here’s how:
  1. Prepare your work surface. (Note: I used a combination of protective surfaces to do my project so I could photograph each step.)  Wash and dry your glass microscope slides.
  2. Cut narrow angled strips of shipping tape that are wider than the microscope slide.  Position and attach to one of the slides, as desired.  
  3. Burnish the strips securely to the glass with the squeegee. 
  4. Apply a generous amount of the etchall Etching Creme over the exposed areas of the slide.  Set aside for 15 minutes for the etchall Etching Creme to do its magic!  
  5. After 15 minutes, use the squeegee to remove the etchall Etching Creme and return the creme into the container.  Yes…the etchall Etching Creme can be used over and over and over again!  Amazing, isn’t it?!  Remove and discard the tape strips and wash the glass thoroughly in a plastic container of water.  Dry well.  
  6. If you want a simple pendant, you can proceed straight to step 7.  
  7. If you want color on your pendant, simply color the etched areas with metallic pencils in the colors of your choice. 
     
    As you can see, I used a rainbow approach. 

  8. Apply a light, even coat of glue onto one side of the second microscope slide. (Note: I just dabbed the glue on with a piece of paper towel.) Gently position and press the glued side onto the colored side of the etched slide. Match the edges and let dry.  
  9. Cut a backing piece of felt, leather or backing material of your choice that is 2” longer and 1/2” wider than the microscope slide measurements.  Glue the glass pendant onto the backing material as shown.  
  10. Fold the top over to the back to create a casing; glue in place.  When completely dry, trim as desired.  Thread the cord through the casing.  


Disclaimer: Since the etchall Etching Creme etches porcelain, as well as glass, please do not use the creme or rinse the project in a porcelain or fiberglass sink or surface.  The best surfaces to use when doing these projects are plastic or stainless steel.

Tuesday, May 15, 2018

Celebrate any special occasion with an Etched Wine Glass!

An etched wine glass makes a great gift for any occasion! 

It is SO easy to make.  All you need is a die cut of your choice and etchall Etching Creme!


You will need:
etchall Etching Creme
etchall Applicator Spatula
#656370 Vine Die cut (Sizzix) or other die cut of your choice
Big Shot (Sizzix) or die cut machine of your choice
Contact paper
Cellophane scrap or other nonstick backing sheet

Also have ready:
Bowl of clean water
Non-latex gloves
Paper towels or other clean towel


Here's how:

1. Clean your wine glass with dishwashing liquid; rinse and dry. If you want to be extra careful, also clean again with a cotton ball dipped in rubbing alcohol right before beginning the project.

2. Cut a 5 1/2" x 6" piece of contact paper and a cellophane scrap (or other backing sheet in the size to fit your die).  Place the cellophane (or other backing sheet) on the adhesive side of the contact paper scrap. Run this contact paper/backing sheet through the die cut machine. You will essentially be creating both a die cut shape AND a stencil shape.


3. Separate the die cut from the "stencil portion.
   NOTE: Set the stencil portion aside and save for another project that will appear on my blog in the near future. 


Remove the backing sheet from the die cut vine. If desired, put the gloves on to reduce transferring oil from your fingers onto the glass. Carefully place the vine die cut shape on the outside of the wine glass and wrap it around the glass.


Using the applicator spatula, burnish the vine so it is well stuck to the glass surface.


Using the applicator spatula, generously apply etchall Etching Creme over the ENTIRE surface of the glass, making sure to not get any creme on the stem or base.


Set a timer for 15 minutes.  When the time is up, gently scrape off the etchall Etching Creme from the tile and place it back into the bottle.  It is resuable!

Submerge the wine glass in the water to gently rinse any remaining etchall Etching Creme from the wine glass. 


Carefully remove the stencil (which you can use again for a second wine glass or additional project).

Note that the vine appears clear and the wine glass looks frosted from being etched!  How elegant is this?!


Saturday, March 17, 2018

Etching a Glass Pickle Jar with etchall Etching Creme!

Do you like to play it "safe" or do you like to step outside your comfort zone sometimes and try a craft you've never done before?  I'm kind of split on it because sometimes it is easier to just stay with what is familiar.  Not sure what drives me--or keeps me so engaged--but I've loved paper crafts for so long, I don't even remember a time when I didn't have inky fingers or a work table buried in scraps of paper and stamps.  I will try anything new that is any way related to ink, stamps, stencils, or can be done on or with paper.   I may not do all techniques all the time or use all the materials long term, but basically if it is something that allows me to use my existing skills, I'm always up for the challenge!

But...once in a while a creative opportunity comes along that has little or nothing to do with stamping, inky techniques or even paper.  Unless it involves materials I cannot use because I'm chemically sensitive--and, of course, sharing my environment with my parrot, Ollie-- it is hard to pass up the fun of learning new crafts and trying something I've never done before.


I was recently asked to join the etchall Ambassador team...and I jumped at the chance! I was a tiny bit hesitant at first, but I can now confidently say I have etched glass....and it was SUPER EASY to do!

The process is quick...and results are AMAZING!  The most important things to remember are (1) think though your project so you know what you want to accomplish, (2) prepare for each step by having all necessary materials gathered and ready, and (3) test the etching creme in an inconspicuous spot before beginning the project to make sure the glass is the kind that can be etched. It is literally THAT easy!

For my first project, I decided to repurpose a glass pickle jar so I can prep and serve my own pickled cucumbers, beans or other veggies.


Here's how:

1. Wash the jar thoroughly with dishwashing liquid, rinse and dry with a clean towel.  I was extra careful so I also cleaned the glass surface with a cotton ball dipped in rubbing alcohol right before I began the project.


2. Instead of using a cutting machine and adhesive sticker paper to create my own stencil design, I decided to use masking tape plus metallic border stickers I already had in my craft stash.


3. I wrapped the stickers and masking tape around the jar as shown. 


4. The jar circumference was larger than the length of the sticker so I cut another smaller piece and added it into the gap.


5. Once I burnished everything securely onto the glass, it was time to apply the etchall creme.


It is meant to be applied generously with a little spatula that comes with it.  


6. Once the creme was applied, I set my timer for 15 minutes.  I actually wound up with a phone call that extended my time to 22 minutes but that was no big deal.  The etchall creme won't etch too much if it sits a little longer.  It just needs a minimum of 15 minutes.

The cool thing was I could actually see the results of the etching process by the time the timer rang!


7. Next I removed the creme from the jar.  Yes!  No waste because the creme is RE-USABLE!  How cool is that?!  So I used my little handy dandy spatula, scooped off as much of the creme as possible and slid it off into the jar to use for another project in the near future.


8. After that, I rinsed remaining creme off the jar in a plastic bowl filled with clean water.  One thing to remember is the etching creme will etch anything glass (like fiberglass) and porcelain, but won't affect plastic.  So I had my rinse bowl already set up and ready to go.


9. Last step is to remove all the stickers and tape.  A little sticky residue remained but I cleaned that off with a little abrasive sponge afterward. 


SO EASY!  Go check out the etchall website for more information, videos, tutorials, projects...and all the cool etching products and possibilities!

Until next time....


Friday, July 21, 2017

Summer IS my Inspiration!

I can honestly say I'm not a fan of winter.  During most of the dark, colorless weeks, my creative work becomes a cozy blanket filing my life with color when snow and cold prevents me from even wanting to go outside most day  But summer is different.  Summer is FILLED with LIFE--and it fills my senses to overflowing!


Windows open wide, I love listening to birds singing, motorcycles rumbling and the sounds of children laughing. The colors of nature...and just the warmth of the sun on my face is truly intoxicating. These gorgeous summer skies and gentle breezes tempt me daily to close my eyes to deadlines and just escape outside to soak it all in!   And...it is especially difficult to stay focused indoors here in Chicagoland when temps hover in the low to mid 80s and humidity is moist enough to soothe but not be uncomfortable.


But all of that sensory information also serves to inspire.  Despite the distractions just outside my window, my creative soul just can't stay quiet and I continue to draw, create projects, write articles and tutorials...and meet my deadlines.

My most recent articles and tutorials on the Favecrafts site are on decoupage....which is one of my crafting favorites!  I will be featuring a a different decoupage tutorial on each of the next few posts so please bookmark my site so you can see them all!


First up is an exciting "How To" Decoupage Guide"  that is jam-packed with information!  In this guide you will learn how to successfully decoupage on glass and other hard surfaces, as well as see lots of examples to get YOUR creative juices flowing!


Leave me a comment and let me know how you love to spend summer!

Saturday, February 18, 2017

CHA Creativation Show Spotlight on Joanne Fink

I don't know where time has flown but I do know it has been a busy few weeks of follow up plus deadlines...and I'm still not finished.  When deadlines take over, I focus solely on what I need to do to meet those deadlines--whether drawing/painting new art collections, prepping artwork into product presentations or creating projects for publication and writing instructions. Throw in some time with family, animals and the grandbaby.....and poof!  It's already been longer than promised but here is my next post about my experiences at the CHA Creativation Show.

As mentioned before, one of the highlights each year is reconnecting with friends in the industry. One of my favorite things to do at the show is to help celebrate their successes.

I LOVE my friend Joanne Fink!  In the years we have known each other, we have both gone through many professional collaborations, changes and successes--as well as personal challenges.

Joanne's lovely smile radiates her beautiful inner spirit....


 Joanne is the art and heart behind the Zenspirations brand and her fan base is worldwide.  Not only am I so happy for Joanne's success, it was a joy to take photos at the Fox Chapel Publishing booth as she began her book signing event for her new co-authored book on bible journaling "Complete Guide to Bible Journaling".  The book is FILLED with her signature art, tons of great samples and pages of elements the reader can use to create personalized pages.

And I am thrilled to have my very own signed book!


Friday, November 11, 2016

Interesting how I don't post much in summer because I just don't want to lose any of that precious time outside. But, the moment it starts to feel and smell like fall, I return to my regularly scheduled blogging.

So this post will be more of a social experiment than the usual sharing photos, events and updates in the lives surrounding the Green Family Craft Zoo. Mainly because this week has had drop dead gorgeous fall weather which we all know will soon come to a screeching halt, slowdown and then....end in the world again turning colorless in shades of white, black and grey.

And so I ponder, as I look outside and marvel at the brilliance of autumn...the psychedelic trees and all the orange, red, brown and yellow leaves scattered over all the beautiful green grass. Fall is one of my most productive seasons to create art because I am surrounded by color on my walks and I am inspired by the color palette when I return.  Which is why I am always sad to see the color slowly fade and disappear.


 Do we really say goodbye to summer and fall with the turning of a calendar page or the changing of the clocks? Or can we hold on to it in our hearts and experiences? In my case, I hold onto summer in my still healing broken toe...but also in the videos and photos that capture the sights, smells and sounds of nature (OH SO MUCH GREEN all around me!) and outdoor festivals, events and fun times.

Tuesday, March 22, 2016

Happy Spring! Happy Crafting!

Spring has sprung, the grass.....oops.  Well, here in Chicagoland, spring is still hiding.  We may have had a very mild winter by Chicago standards, but it has decided to stick around a bit longer and give spring a bit of an attitude.  Kind of a seasonal sibling rivalry thing.

So, while outdoor temps are not at all tempting, the indoor crafting climate is still quite warm and inviting! I was recently let loose and unsupervised again in my craft room last week to develop techniques and projects for Prime Publishing.

Here is a sneak peak.....more info to be posted next week....

Faux Hammered Metal Frame with Dimensional Flower Power (shown below)
Can you believe this frame was made just using an ordinary pre-cut mat (plus a secret ingredient)?  Now...can you guess how I made the dimensional flower?  I'll reveal all next week.....


And...here is yet another approach to this cool look.  This time, the project takes a more literal 3-D approach, transforming a GLASS container into something totally upscale!

I call this my Mixed Media Faux Hammered Metal Container


I used a double embossing faux antique hammered metal technique to create the container.
Here you see the same container in both photos BUT with different approaches to the container lid.  Stamped and inky sprayed canvas flower and leaves above.....button collage below....


Stay tuned for more info on these projects......