Thursday, December 21, 2017

Fun Color Pencil Technique for Christmas!


I am currently putting final touches on a book manuscript due at the publisher after the holidays. That means I will soon be taking off my writer's hat and replacing it with my designer/illustrator's cap. 

The next 4-6 weeks will include creating new art for my next rubber stamp release with Impression Obsession, along with creating oodles of cards and other stamped projects with stamps from my latest images.  Here's just a small peek at my new D7881Snowman !


So, beside deadlines--and pre-trade show season--we are also smack in the middle of the holiday season!  Whew!

Has the craziness of the holiday season gotten to you yet like is has to me? All I want to do right now is de-stress and disappear by doing a little creative play! (No calories or high risk behavior side effects other than inky fingers and a totally trashed studio...lol!)

The biggest question is always...where to begin!?  I'm still mourning for summertime (sniff) but not yet deep into hibernation winter mode.  We have no snow on the ground here in Chi-town, so my strongest Christmas inspiration this year will be from my new winter stamp images!


One of my very favorite things to do is to explore with color. And, since the students in my weekly drawing class are currently working in color pencil, I have color pencil on my mind.  From the results, I'd say my F7886 Holiday Goose agrees color pencils make a really good play choice!


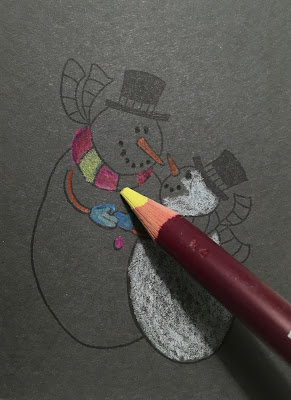
It is really fun to do things out of the ordinary so I decided to begin by stamping on colored cardstock.  The great part about this technique is that the actual color of the cardstock becomes a tonal value influencer for the final piece.  What that means is the color of the cardstock will show through the color pencil layers and influence the overall color value of the piece. 

Here is how I started:


I stamped on grey cardstock using Wicked Black Colorbox Archival dye ink (Clearsnap). Once the stamped image dried, I added black pencil to the eyes and mouth.  I did that to prevent any white pencil strokes from obliterating those features since the pencil will tend to dim the ink beneath.  Once I laid down some basic color strokes, I returned with a second pencil layer and blended colors together using pressure and stroking in multiple directions to blend.  I kept going until the image was colored.  As you can see, I stroked pencil right over some of the outline but left the outline visible in other areas. Then I went back and darkened some of the black areas in the hat and added some lighter grey shading details on the snowmen and the snow beneath them.  I even added both white and light grey snow falling from the sky.


Then, I decided to try the same image on a lighter, smoother cardstock.  Same pencil approach, different result!  Pretty cool eh?!


I repeated the same experiment using my F7886 Holiday Goose stamp image.  First the dark grey cardstock...then on the lighter, smoother cardstock.
In both versions, you can see how the color of the cardstock becomes the tonal and color value influence in the final piece. 

I just LOVE how I achieved two totally different looks just by using different cardstock and colors! Both of these pieces will make beautiful cards and other projects!

While the results looks very skilled, the technique is actually very easy.  Of course, my stamp images give you the basic image without your needing the drawing skills. 

Sshhh...don't tell anyone! Just enjoy the praises you will get when you try this color pencil technique!

(Any questions? Please comment...)


Saturday, November 18, 2017

Got Clutter? Tips to Destash and Declutter!

There is an element in creativity that demands we let go and let ourselves run free.  In my world, that also means periodic chaotic mess in my work space because, well, that's just how crafting is done. When the creative frenzy ends, however, I simply clean up and put things back in their places until the next inspiration or deadline.


But it is different when I look around my home and see living spaces that need more than just a bit of tidying up.  In that context, the clutter is simply excess out of control. It is visual chaos, confusion and bad feng sui. It also makes me feel overwhelmed and out of control.

Let's face it.  We ALL have stuff we don't use, don't need or have simply outgrown. It is just part of being primal human gatherers.  And in a world bombarding us daily with retail temptations like Black Friday sales (basically year round) and coupons coming out of our ears, how can our homes remain pristine and clutter-free?

The answer is actually simple.  Routine "de-stashing".  Every time we bring something new into our living environment, we need to get rid of something that is already there.  If we never increase our belongings, we will never experience out-of-control clutter.

Sure, it's easy relatively easy to gather and give away the obvious--like the shoes that hurt to wear or the useless gadget that jams the drawer each time we open it--but what about all the items that fall into that 'grey' area?  You know the ones.  The jeans we LOVE but are still too snug to actually wear comfortably for the past 2 years (or more).  Or maybe that cool tortilla maker we used once when we had a free afternoon to actually cook from scratch.  Those are the difficult decisions to make because we have an emotional connection to those items. 

We need ninja decluttering strategy tips to deal with those areas of clutter:

1. Enlist a friend who is not emotionally connected to any of the items in question to help us make decisions or actually go through those "grey" piles and box them to give away or sell for us.

2. Identify items that we perceive as having special value and find new homes for that will appreciate them.  Knowing that the items will be "loved" makes it easier to give them away.

3. Take photos of items or groups of items that have emotional meaning before boxing them to give away. Taking the photo serves as a symbolic act of saying goodbye and can give a sense of closure. And a few photos take up waaaay less space!

4. If you are parting with a large collection of items that have significant emotional meaning or are items additional family members may also be connected with, place those photos into an album.  Knowing you have the memories safely stored will make the de-stashing easier.

5. Find a good cause that you believe in and donate items to be used for fund raising or to help people or animals in need.  Knowing that the items will be helping others gives the act of de-cluttering a sense of purpose.

6. Box those hard-to-part-with items and put those boxes away with a note to reopen them after one year.  If you find you have forgotten all about them after all that time, you will find it may be easier to sell or give them away.

7. Have a garage sale and celebrate your de-stashing by spending the money on experiences instead of on more "stuff". 


Next time, I will address the destash and declutter process that relates to so many creative thinkers.  Yep, fellow crafters, I feel your pain! This is the one area in which I totally struggle. How on earth do I declutter all that craft stash?!

Sunday, November 5, 2017

Goodbye Daylight Savings Time....Happy Wet November!

Ok, ok...so I haven't blogged  for a while.  Yeah, for weeks.  Actually almost 2 months. 

I have to admit, I would be more encouraged to blog if my readership would grow and if readers left comments so posts became a conversation...instead of what weirdly feels like just talking to myself.  Which, like most creatives, I already do without blogging.  I would even appreciate someone courageous pointing out if my posts are, well, kind of pointless, so my blog is not worth the time to visit, read and comment. That way I could plot a new course of action! Which is why I just pushed outside my own comfort zone and expressed my thoughts.

So.... with that said (and hopefully stirring up the pot), I am here now blogging! And... all is good!
 
Hope all has been well with you, as well.  Summer was such a busy time of outdoor activities and, social events, I kind of forgot about blogging.  I mean, I still posted on FB and Instagram via mobile devices, but let's face it-- who wants to sit indoors at a computer screen when summer is beckoning outside?!  (Sigh.  Now that leaves are turning and I need a coat, hat AND gloves, I really miss my no-fuss summer walks!)

It is actually very symbolic for me to write to you at this transitional time of year.  My life is currently in transition.  Not just the normal seasonal changes or "I'm-geting-older" changes so many of you are also going through. Bigger stuff.  Life event and new chapter type of stuff.

Almost everyone and everything around me is in a state of flux which affects everything I do--like a domino effect.  As 2017 slowly slides to a close, I foresee lots of changes for 2018.  In fact, I see 2018 shaping up to be one of those milestone years. You know what that is...those are the crossroads you look back at later and realize shaped the path you walked.

So, with that said...so far this year we have celebrated the birth of a new grandchild...little baby Sophie....who, amazingly resembles my grandmother--something that makes my heart fill with joy each time I see her smiling face or hear that adorable little giggle.


We have also had loss. 

Tuxedo passed over the Rainbow Bridge this summer at the ripe old age of 14.  He was the first dog we have had who just literally laid down and died--no fanfare, no drama, no hard decisions to make.  He was always the dog who belonged to himself. So he waited until he had some "alone time", somehow managed to crawl over to the spot where my scent was the strongest, lay down and peacefully let go.  He had already said goodbye in his own way earlier that morning so he was ready to go see his buddies Shady, Tyler and Sudsy.

 Till next time....
Gail


Friday, August 18, 2017

Summer Bliss Topped with a Hint of Fall

Hope everyone has been enjoying the summer!  Have you been traveling or enjoying local festivals, and farmers' markets? Or have you been chilling in the hammock and sipping ice tea?

While much of the country may still be in toasty hot mode, Chicagoland and neighboring parts of the Midwest have been enjoying a more moderate summer. In between the record breaking rain (and subsequent flooding), our temps have been comfortable enough to keep windows open part of the day and throughout the night.  That definitely saves on our air conditioning bills!

However, temps like these also remind me of what is just around the corner. Since it feels a little bit like autumn, it seemed logical to stamp some fall-like cards--especially after I received my "happy mail" with samples of my brand new fall stamp images from Impression Obsession!

Happy stamping!


Thursday, August 10, 2017

Color Pencil Guide

Looking for help with coloring stamped images with color pencil?  Good news!  My new guide and tutorial "How to Color: Colored Pencil Basics for the Crafter" is now live on the Favecrafts website!

This article is totally STUFFED with great information, including basic color theory, pencil strokes, color layering steps and more. Best of all, I've also included a step-by-step tutorial to help you in your journey.

Please check it out...and leave a comment!

How to Color: Colored Pencil Basics for the Crafter


Thursday, August 3, 2017

Decoupage and Beer

It isn't often that "decoupage" and "beer" come up in the same sentence. However, this is one of those rare occasions when the combination is perfectly logical!

Empty beer (or other glass beverage) bottles are some of my favorite items to repurpose. While there are multiple techniques and mediums that can be used to transform a simple glass bottle, one of my all time favorites is decoupage!  I love the simplicity of decoupage and that it is a relatively inexpensive craft for all ages and skill levels.  Decoupage mediums like Mod Podge make it super easy since you can attach and seal using the same product.  Paired with torn book pages and printed paper napkins, and embellished with beads, buttons, and/or silk flowers, this project becomes the perfect mixed media vase for all those beautiful summer flowers!

I like to get  an early jump on the holidays and have already made several for gifting. These would also make great craft fair items.

So sit back and enjoy a summer brew...then hop over to the Favecrafts site for a full tutorial with step-by-step instructions!

Thursday, July 27, 2017

Living in the Moment

Hooray for today! Summer is still here and I'm loving every magic moment that presents itself.

Living with dogs for over 25 years has taught me more than just how to teach a puppy to sit and stay. Dogs, you see, have mastered the art of "living in the moment".  This skill is counter-intuitive to our deadline driven society and, sometimes I even think, to our human nature of planning ahead and dwelling on the past.


In reality, every day is a treasure of its own, to be savored and enjoyed to its fullest. Sometimes that means stopping whatever we are doing and just being still. Quiet the brain, relax and focus on the moment instead of the "next" and the "next", ad infinitum.  It means it is sometimes okay to just "be". That is the only time the "off" switch appears so the creative side of my brain can actually turn off, even if just for a few minutes or hours.

And that's why I love summer so much.  There is so much magic in so many warm moments.  After I take those little "just be" breaks, the "creative" cranks right up again into high gear. I find I am refocused with a clearer vision. Deadlines also transform into exciting challenges instead of exhausting drains.  That is mighty powerful stuff!

Meanwhile, I'm still glowing from my latest projects and published articles and tutorials for Favecrafts.com.


As promised, here is the link to my recent tutorial published on Favecrafts.  This tutorial features THREE projects and three different approaches to decoupage on wood hangers!

The projects are SO much fun to do and sure to brighten up anyone's closet.  A great project to encourage kids to hang up their coats and clothing items--especially if they decoupage their own personalized hangers.

These decorated hangers would also be a perfect gift item either given as a set or accompanying a special item of clothing.


Friday, July 21, 2017

Summer IS my Inspiration!

I can honestly say I'm not a fan of winter.  During most of the dark, colorless weeks, my creative work becomes a cozy blanket filing my life with color when snow and cold prevents me from even wanting to go outside most day  But summer is different.  Summer is FILLED with LIFE--and it fills my senses to overflowing!


Windows open wide, I love listening to birds singing, motorcycles rumbling and the sounds of children laughing. The colors of nature...and just the warmth of the sun on my face is truly intoxicating. These gorgeous summer skies and gentle breezes tempt me daily to close my eyes to deadlines and just escape outside to soak it all in!   And...it is especially difficult to stay focused indoors here in Chicagoland when temps hover in the low to mid 80s and humidity is moist enough to soothe but not be uncomfortable.


But all of that sensory information also serves to inspire.  Despite the distractions just outside my window, my creative soul just can't stay quiet and I continue to draw, create projects, write articles and tutorials...and meet my deadlines.

My most recent articles and tutorials on the Favecrafts site are on decoupage....which is one of my crafting favorites!  I will be featuring a a different decoupage tutorial on each of the next few posts so please bookmark my site so you can see them all!


First up is an exciting "How To" Decoupage Guide"  that is jam-packed with information!  In this guide you will learn how to successfully decoupage on glass and other hard surfaces, as well as see lots of examples to get YOUR creative juices flowing!


Leave me a comment and let me know how you love to spend summer!

Thursday, May 4, 2017

VIP Favecrafts Best Blogger contest is LIVE!

Do you to love to upcycle, recycle...and decoupage!  Well, here is the perfect project for you! Not only have I created a whole new purpose for coloring book pages, the results are stunning!

But...I really need your help!
This project has been entered a contest over at Favecrafts and every vote counts!

Please vote for my project!  Here is the link:
https://www.favecrafts.com/voting/Blogger-Contest-2017 


Tuesday, April 25, 2017

Bloom Where You Are Planted Decoupage Flower Pot

Spring is in full BLOOM! The pure AWESOMENESS of spring has definitely arrived now in all of North America!  Snow and winter grey fuzzies have been replaced by Pantone's beautiful leaf green, accented by splashes of every color of the rainbow. Every tree, bush and plant is exploding with flowers and color. Southern areas are already enjoying their first harvest while the areas further north are in tulip and daffodil heaven right now.  

For those of us with spring allergies, whew....we are in full blown sneeze, itch and drip mode, the ants they are invading and yes, rainy days and mud-filled back yards are also part of the deal. But that's such a small price to pay because the air is absolutely golden and the world is filled with LIFE again. 

With spring, comes renewed opportunities for outdoor patio time, as well as starting those flower seedlings or herb gardens inside to brighten up our home interiors.  What better way to enjoy our plants than by creating a spectacular hand crafted pot for display!  


Many of us wonder what to do with the coloring pages we've finished, but wonder no more! Use pages you've already colored, or take this as an opportunity to sit down and do more coloring so you can make my Bloom Where You Are Planted Decoupage Flower Pot project. This beautiful decoupage craft is lovely for spring, gift giving occasions, crafting with kids or grandkids, or almost any rainy day. Stay inside and make something bright and cheerful. Once you've finished this lovely coloring page project, you can plant something inside. Jump over to the FaveCrafts site for instructions and let your creativity (and your flowers!) grow with this beautiful project.   


Sunday, April 2, 2017

Mixed Media Recycled Box for Pet Lovers!

Do you love mixing media AND repurposing items as much as I do?  I'm not sure if it is the accessibility of materials, being frugal or having a social conscience about landfills but there is just something about combining recycling with mixed media that gets my creative juices flowing!

So here is a fun way to recycle bits and pieces in your craft "stash" to create a little treasure box, using easy peasy crafty techniques!  While the example below sports an image of a kitty, feel free to use your favorite dog image instead!
Note: This project was published in the recent spring issue of "Just Mixed Media" magazine (Scott Publications)


Materials you will need:

Empty small  metal, cardboard or paper mache box of your choice
Impression Obsession Rubber Stamps: Uh Oh #A7510
                                                               Rosie & Bandit #F7531
                                                               Fur with Brains #B7506
Clearsnap: Colorbox® Archival Dye inkpads (Wicked Black, Saddle, Pumpkin Pie, Squash)
                  Art Dauber
Beacon AdhesivesZip Dry® Paper Glue 
                                Gem-Tac® Permanent Glue 
                                Fabri-Tac® Permanent Adhesive
Acrylic craft paint (white)
2" chipboard circle
Scraps of white and black cardstock
Ribbon or other fiber trims of your choice
Printed text scrap from book, newspaper or magazine

Instructions:

1.  Using Art Dauber, apply thin coat of white paint to chipboard circle; smooth edges and dry. Stamp the Kitty in black; dry.  Dab black ink around edges to grunge; dry completely.
2.  Measure and cut one strip of printed text and one strip of white cardstock to fit around the sides of the box. Take each strip and crinkle it in your hand; relax strips and lay flat on your work table. Using Direct-to-Paper (DTP) technique, apply Saddle to to text strip and Pumpkin Pie to the white cardstock strip. Glue crinkled text strip to box.
3.  Stamp "Fur with brains" on white crinkled scrap; trim and attach.
4.  Apply Squash DTP to remaining printed text scrap. Measure around the lid and hand tear scrap to fit. When dry, attach to lid with Zip Dry.
5.  Measure and cut a strip of black cardstock to fit around side of lid; attach. Cut ribbon to fit and attach with Fabri-tac.
6. Glue stamped chipboard circle on top of lid as shown, using Gem-Tac.
7. Stamp "Uh Oh" on ribbon scrap; attach to top as shown.

Tuesday, March 7, 2017

Be Crabby Card

Who says Mixed Media has to be filled with lots of bits and pieces covering everything?  Just like most people with a fondness for IKEA's modern, clean lines,  I tend to be a bit of a Mixed Media crafting minimalist.  I love the simplicity and balance of threes...and the use of just a few items to create a powerful statement. I also LOVE finding creative uses for repurposing items most people just toss into the trash.


Here is a really cool card I made using a moveable crab die cut from Eye Connect Crafts! This card was recently published in Just Mixed Media 2017 (Scott Publications).  Note how I used a scrap of netting from a grocery store pack of oranges to add color and dimension to this fun scene!

The crab die cut comes already pre-cut and ready to decorate and assemble.  I used a simple 'direct-to-paper" (DTP) inky approach with Art Daubers and Clearsnap Colorbox® Classic Pigment ink to initially coat the pieces.  After drying with a heat tool, I applied Colorbox Archival Dye ink DTP using the ink pad as a stamp and positioning the pad so the corner created a triangular imprint on the body and the claws.TheArt Dauber was used again to add a bit of shading to the legs and around the body. After the ink was dry, the body was assembled by inserting mini colored brads through the pre-punched holes.  After dabbing Wicked Black around the card edges, a piece of netting was carefully arranged along the bottom and side and glued on to the card with 3-in-1 Advanced Craft Glue (Beacon Adhesives). The crab was positioned in place and glued over the netting and onto the card, as well.

And there you have it!  An adorable card that will make even the crabbiest person smile!

As always, please leave a comment!  I'd LOVE to know if you enjoyed this project!

Tuesday, February 28, 2017

Cover Girl on Just Mixed Media - Volume 2, 2017

And more exciting news on the publishing front....
I'm a cover girl again!  Yep, one of my Mixed Media projects is featured on the new issue of Just Mixed Media (Volume 2, 2017)!


You can see my Butterfly card project under the "Paper Arts" heading.  But, here is a closeup.....


I used a variety of inky techniques on both the Strathmore Greener Options Bamboo note card (www.strathmorearatist.com) and on the moveable die cut chipboard butterfly from Eye Connect Crafts ( www.eyeconnectcrafts.com )

Basically the butterfly is primed first, then sponged, stenciled and grunged using Direct-to-Paper (DTP) and lots of yummy Archival Dye inkpads from Clearsnap!  Assemble the butterfly with wire, brads or other attachment findings of your choice. Then grunge some torn text strips and glue onto the wings using Beacon's Zip Dry Paper Glue.  Cut ribbon strips and attach with Beacon's Fabri-tac.Permanent Adhesive  . Attach small beads to the antennae, if desired.

Create a faux watercolor effect on the card using Clearsnap Colorbox Sprays and then lightly spritzing or splattering on glass cleaner for the waterspot effect.   Attach the butterfly body section to the card with Beacon's Gem-Tac Adhesive....and there you have it!  A GORGEOUS Mixed Media Butterfly card!

If you leave a comment asking for more information on specific inky techniques, I can post more detailed instructions in upcoming posts!

Just Mixed Media is an awesome magazine published by Scott Publications.  Scattered throughout the pages are a wide variety of mixed media projects--from cards and ATC's to textiles, wood, metal and  other sculpted pieces.  The magazine is on newstands everywhere or can be ordered directly from the publisher's website: www.scottpublications.com

Sunday, February 26, 2017

The Life of an Artist

I was recently conversing with a fellow artistic soul on FB. She shared some color practice work in process for a series she was going to paint depicting her beautiful mesa and the surrounding mountains in her area.  After expressing she felt she could "swim" in the colors surrounding her, she stated she was mostly surprised she was being drawn to painting landscapes after many years of doing portrait work.  I responded that it was because she is surrounded with such beauty...and nature's spirit.  Her response "It's my heart beat showing up on canvas" took my breathe away...and got me thinking about what makes art...art.    And why most artists consistently feel that no one actually "gets them"--except other artists.

Maybe that is why people who don't create art and consider themselves "non-artistic" are always iso amazed with art and in awe of those of us who create it.  They don't understand us OR the creative process.  They simple cannot understand how artists are able to paint little pieces of our hearts and souls in everything we create.  And yet, we are basically oblivious that we are even doing that in our art and incapable of actually breaking down our individual creative process to evaluate HOW we do that. We just....do it.

Butterfly image by Gail Green for Impression Obsession Rubber Stamps; background created using Colorburst (Ken Oliver Crafts); butterfly colored in using marker blending with a shimmering top layer of Wink of Stella (Kuretake)


This instinctive, innate ability to tap into our souls and pull out pieces may also be why artists are so instinctively entwined with each other.  We understand each of those heartbeats and understand each other.  Our tribe.  And while it often takes years for people to get to know each other, artists can often accomplish within just a few minutes by simply watching another artist's process and/or seeing what another artist creates.  We intuitively understand what is behind the art and instinctively feel the process at a much different level than the average viewer.  Our sensitivity may be high to begin with but we all have left so many clues in our art.  It's just that most other non-artistic people either don't see the clues, lack the ability to understand what is usually obvious to artists and/or have no idea how to accurately interpret them.

What are your experiences as an artist?  Do you even realize how much you reveal of your own heartbeats in your art?


Saturday, February 18, 2017

CHA Creativation Show Spotlight on Joanne Fink

I don't know where time has flown but I do know it has been a busy few weeks of follow up plus deadlines...and I'm still not finished.  When deadlines take over, I focus solely on what I need to do to meet those deadlines--whether drawing/painting new art collections, prepping artwork into product presentations or creating projects for publication and writing instructions. Throw in some time with family, animals and the grandbaby.....and poof!  It's already been longer than promised but here is my next post about my experiences at the CHA Creativation Show.

As mentioned before, one of the highlights each year is reconnecting with friends in the industry. One of my favorite things to do at the show is to help celebrate their successes.

I LOVE my friend Joanne Fink!  In the years we have known each other, we have both gone through many professional collaborations, changes and successes--as well as personal challenges.

Joanne's lovely smile radiates her beautiful inner spirit....


 Joanne is the art and heart behind the Zenspirations brand and her fan base is worldwide.  Not only am I so happy for Joanne's success, it was a joy to take photos at the Fox Chapel Publishing booth as she began her book signing event for her new co-authored book on bible journaling "Complete Guide to Bible Journaling".  The book is FILLED with her signature art, tons of great samples and pages of elements the reader can use to create personalized pages.

And I am thrilled to have my very own signed book!


Monday, February 6, 2017

And live from Phoenix at the Craft & Hobby (CHA) Trade Show!

Ok.  Almost live.  Ok fine....I WAS live at the CHA Creativation show but the show was actually about 2 weeks ago.  I can now report that I have survived all the prep, travel, lack of sleep and over-the-top mind boggling creative energy! And I'm ready to blog about it!

Taking a class at CHA show last year...
Blog about WHAT?  Big deal Gail went to a craft "show" of some sort? Um....no. Let me explain....

For those of you who may not know, I am a professional designer in the Craft & Hobby industry (affectionately referred to as CHA) And after months of prep and hard work, we just had our annual international trade show.  So basically all the creative minds in the industry PLUS all the craft materials under one roof.  Can you even imagine how that would look...or feel?  Just think Michaels, Joann's, Hobby Lobby and all the independent yarn, scrapbook, stamp and general craft stores across the world plus all the vendors in temporary spaces at events like Scrapbook Expo and Rubber Stamp conventions.....place them inside one building....all together...with classes, demos, make-n-takes and sample displays basically everywhere....and you now have a clearer image.

Trust me, it takes a while to unwind and catch up on sleep. Hence, why I am blogging 2 weeks afterwards.

Between meetings and my teaching classes, I am always SO insanely busy at the show, I usually forget to take photos of booths and all the wildly creative samples and products that surround me. And this year was no different. However, I DO remember to take a photo here and there of friends or celebrity moments....like this one with David Tutera....


or moments at an industry event with my designer peers Julie McGuffee and Cathy Filian.....


I will post more photos and insight in the next few days...and, hopefully share photos taken by those who remember to snap away as they experience the creative surroundings!

Stay tuned!