Showing posts with label Beacon Adhesives. Show all posts

Tuesday, October 9, 2018

Oh no! Is Autumn Already in the Air?!

Summer is barely out the door but autumn is already in the air!  I already see trees turning color here in Chicagoland....and we are all feeling the chill in the air enough to turn our furnaces on now at night and add that extra blanket.

So....what's a girl to do but give in to the season ahead and start stamping some HALLOWEEN cards!  Somehow, that seems to make the chill of the season a lot less spooky.....

I thought I would start with one of my latest stamps from Impression Obsession Rubber Stamps....

D7982 MUMMY!

(I never could draw scary....so it's a CUTE mummy!)


I used TWO fun techniques in this card.  

First I stamped the Mummy on a white cardstock scrap with Licorice Colorbox®️ Premium Dye ink pad.  Then, instead of lifting the stamp up, I rotated it so I got additional impressions that gave it a look of movement.  How fun is this look!

Next, I grabbed some Art Daubers and had some play time on the notecard!  I created a random pattern using Colorbox®️ Premium Dye ink pads (Banana, Tangerine, Grape).  Then attach the layers with Beacon Adhesives

Zip Dry®️ Paper Glue.

Please let  me know how you like these techniques and project by leaving me a comment….


Thursday, September 27, 2018

Mastering the Art of the Silhouette Stamp

Mastering the Art of the Silhouette Stamp

I LOVE the ease and simplicity of combining colorful backgrounds with silhouette stamps! There are SO many cool, inky techniques that can be used to create backgrounds.  And those backgrounds can really "pop" with a simple solid silhouette image (or images) stamped over them.

And then the mad stamping scientist in me wondered: "What would happen if the silhouette stamp image was also approached as we do the background?  What if I turn that solid silhouette into a colorful image with defined sections using both color and dimension?"

And just like that....a fun inky embossing technique was born!


As you can see, the stamp I used was a nicely detailed solid silhouette which makes a great statement when stamped in black ink over a multitude of backgrounds.  (This stamp is from an image I drew for Impression Obsession Rubber Stamps.)  However, adding color to the actual image, along with heat embossed dimension changes not only the entire look, but also the process.  Instead of overstamping the silhouette image onto a colorful background that has already been created, the background is actually created last with this technique.  


Here is how....

Lion Stroll Card


Supplies:

     J7950 Lions
     CC234 Bark

Clearsnap:
    Colorbox®️ Petal Point Classic Pigment Inkpad (Arboretum, Envy)
    Colorbox®️ Embossing Powder (Clear)
    Top Boss®️ Embossing Stamp pad
    Colorbox®️ Premium Dye ink pads: Banana, Tangerine, Guava, Grape, Blueberry
    Colorbox®️ Archival Dye ink pads: Mudslide, Seattle Sky
    Art Daubers

Beacon Adhesives:
    Zip Dry®️ Paper Glue

    Premium Tacky Glue

Heat tool
White, tan, black and decorative cardstock.
Yarn or ribbon trim


Instructions:


  1. Place Lion stamp rubber side up. Remove desired color sections from the Petal Point inkpads. Using the tip of each section, apply ink directly to the Lions stamp, blending as desired.
  2. Stamp the lions onto 4" x 6" white cardstock. Pour clear embossing powder over the image; tap off excess.  Heat until melted. 
  3. Beginning in the center with Banana, use Art Daubers to apply Premium Dye ink. Use the remaining colors in the order in which they are listed to create a sunrise sky. Since the lions were heat embossed, that clear embossed layer acts as a resist mask so the dye ink only sticks to the area around the lion image.  
  4. Apply Seattle Sky and Mudslide on the Bark stamp; stamp image onto a 5" x 7" tan notecard. 
  5. Trim remaining cardstock; attach all the layers to card using Zip Dry®️ Paper Glue.


And then there was the surprise "Bonus" card.  


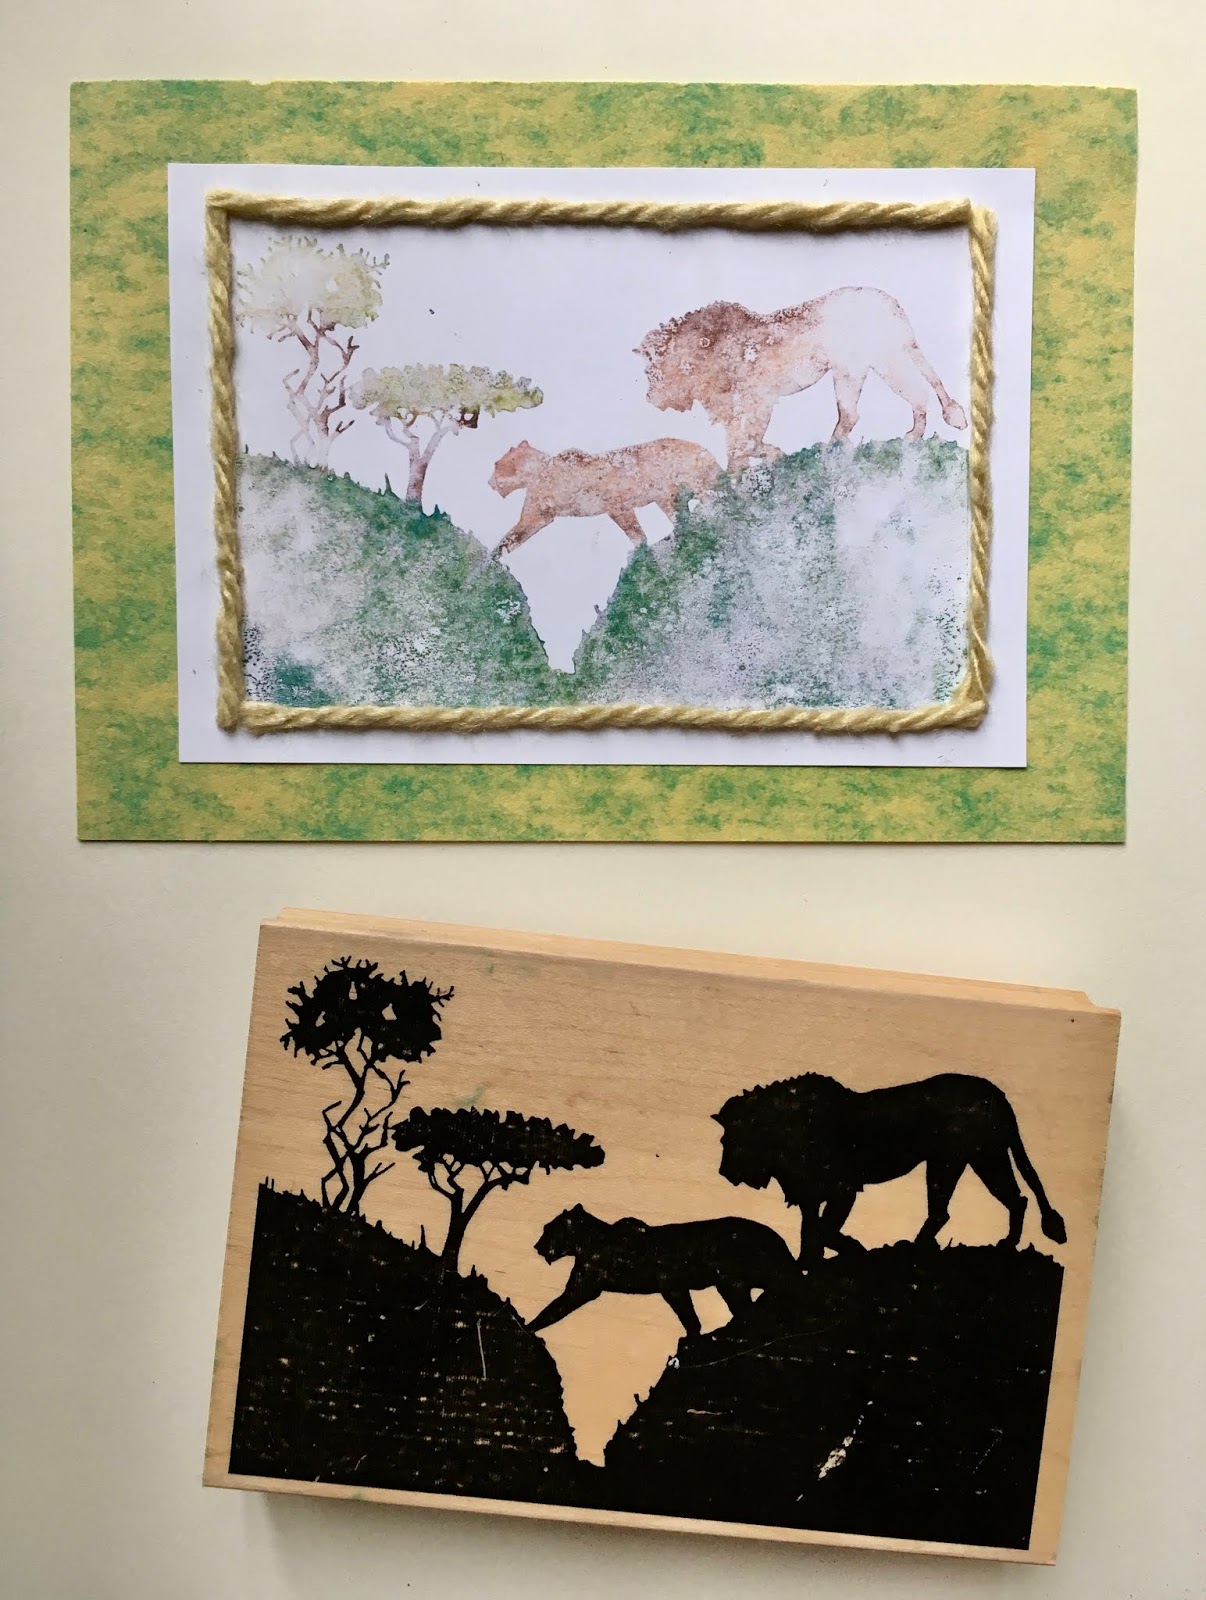
Since pigment ink remained on the Lion stamp after the initial stamping step, I wanted to first "stamp off" the ink before using my ink cleaner pad. Then I decided to experiment.  Instead of just using scrap paper, I decided to "stamp off" the image onto a piece of coated white cardstock.  While the resulting image is not the densely colored, crisp image we saw in the first card, the "stamp off" image had instead a softer, more ethereal look with an interesting painterly quality.  I then paired this stamped image with a soft background cardstock and wheat yarn trim (attached around the image using Premium Tacky Glue).  I love surprise inky techniques and am SO very pleased with this second "bonus" card!   

What do you think about these two fun looks using Silhouette stamps???!!!


Friday, December 16, 2016

And here is the article on Monotones!

Aren't I being good?!  Another article....this time in the December 2016 issue of Scrap & Stamp Arts magazine.....

This article was a challenging one since I limited myself to ONLY using black, white and gray.  At the same time, it was also very rewarding because I love limits.


A peek at some of the projects in the article!


While exploring the possibilities I discovered how much fun it was to use inky techniques with embossing folders.  (Embossing folders used are from Sizzix/Ellison.....)


Wednesday, November 16, 2016

Creating Curiosity Shadowboxes

Some of you have been asking for me to post when a craft project or article is published. As new feature on my blog, I will be posting whenever new issues and articles in Scrap & Stamp Arts magazine (or any other publication) are available.

So, without further adieu.....here is the latest!

Check out the November/December 2016 issue of Scrap & Stamp Arts magazine for my latest article on creating Curiosity Shadowboxes!

A sneak peek below! All the projects include materials that are part of most crafter's craft "stash", as well as recycled/repurposed items.

If you love the stamp images, check them out at Impression Obsession  Just search under Artist and then my name....

Enjoy!


Monday, July 25, 2016

The past few weeks have been super busy and even though I keep meaning to post, I basically got so sidetracked with the gorgeous weather, I didn't.  Oops...my bad....

Now the steamy heat has made its way to Chicagoland, I'm staying inside a little more and should hopefully be posting more frequently.  Well, at least more frequently than every 2 months...that's for sure!

One of my goals is to post projects and techniques that have been published in Scrap & Stamp Arts magazine.  Here is one to start....stay tuned!