Wednesday, June 19, 2019

Create some BoHo Rooster MAGIC with the Embossing Resist Technique

One of the most satisfying aspects of stamping is the ability to create projects using a variety of techniques at different levels of complexity.  While my recent Boho Rooster project was done using very basic techniques, I went to a whole different level with this new project!  Using a technique I call "Embossing Resist",  I basically created a pattern using a solid silhouette stamp! It sounds complicated and looks complex but trust me, if you follow the steps outlined below, you will get the same (or equally) interesting results!


Again, I decided to use a sheet of printed text torn from an old book.  I love using printed text pages because the text is already there,...plus the paper is usually lightweight and perfect for easy ink absorption.

For this project I used Boho Mandala plus one of my new silhouette stamps from Impression Obsession -- Rooster 1.


I began by prepping my paper.  Using DTP (direct-to-paper) and sponging added color and grunge to the plain white background.  (I used Clearsnap Colorbox Archival Dye inkpads in various colors.) And since dye ink is transparent, the printed text shows right through. Another way to ink the paper is to use spray inks.  This technique does make the paper super wet which then has the potential to cause it to curl.  To keep curling at a minimum, I'll dry the paper immediately with a heat tool and then let it finish drying overnight with a heavy non porous weight (like a plastic box filled with inkpads or an old metal cookie tin) sitting on top. 

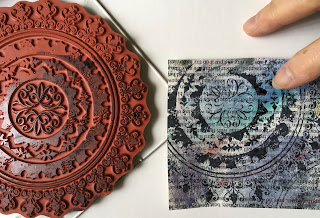
When the paper is completely dry, it's time to begin stamping.  I stamped my Boho Mandala off-the-edge an then repeated it again in the opposite corner. 


Now the fun part begins.  
To create the resist effect, I stamped my Rooster 1 in the center of the paper using clear embossing ink.  I then sprinkled clear embossing powder on top, shook off the excess and melted it with a heat tool.  The cool thing about embossing is it creates a resist to most water-based wet media.

I then sponged on additional ink around the image, making sure to use a high contrasting color.  

This technique can can be used in dozens of different ways and color/design combinations.  Sometimes it is fun to experiment and just take the opportunity to let your creative heart shine!


After a little hand tearing and layering, here is the finished project!  Beacon Adhesives Zip Dry Paper Adhesive makes the layering super easy to do.


Wednesday, May 29, 2019

NEW Rooster Stamps are IN the HOUSE!


One of my favorite stamps and stamp sets from recent releases are the Boho set and the Boho Stamp.  These stamps allow for such a wide variety of combinations and techniques, I literally could NOT put them down when my samples arrived.  Which means I literally stamped a zillion papers in my creative experimentation with them.  So, when my new summer release samples arrived, I took one look at my solid silhouette roosters and knew EXACTLY where I was going to head!

I grabbed a sample from all my previous Boho experimenting and the rest just....happened!

And oh my....this card was such a simple quick process.  That's why it really pays to make lots of extra background paper designs when you are "in the magic mojo moment".  You never know when you will need one!

This sample shown below was done on a printed text page from an old hardcover book.  It was stamped using a variety of Clearsnap Archival ink colors and sponged with a quick drying pigment ink.  Since it had been allowed to dry for weeks, it was all ready to use when I found it in my stash!


To create my rooster card,  I stamped  Rooster 1 and Rooster 2 using Clearsnap's Top Boss embossing ink and heat embossed with clear powder.  Doesn't really get simpler than that!


Then I hand tore around edges.....


....and attached the stamped/embossed layer to an off-white cardstock layer using Beacon Adhesives' Zip Dry Paper Glue.  Finally, I attached everything to a tan notecard and grunged the notecard edges with Clearsnap's Art Dauber and Wicked Black Archival Ink.

That's it.

Easy peasy!


Tuesday, May 21, 2019

Hummingbirds...and away we fly on a creative adventure!

As I tentatively embrace spring (which, in Chicagoland, has been mostly non-existent so far), I'm reminded that summer cannot be far off.  And the arrival of summer also includes the Impression Obsession SUMMER stamp release! Yay!  I have some SUPER fun new stamps and stamp sets launching with this release.......

So, in celebration of SPRING (hopefully...finally...we need spring...), I'll start this new blog series with my brand new Hummingbird stamp set!


This is SUCH a fun set, I couldn't wait to start playing with it...

But first I had to narrow down exactly what I wanted to make.  And, if you know me at all, you know I usually don't just do traditional.  Nope.  I usually try to find new ways to use materials or change up techniques so they have a new "spin".  So, yep...you guessed it!  I went renegade before I even opened the Hummingbird set packaging.  LOL!And away I flew on another creative adventure!

When I went to grab my Strathmore Bamboo notecards, I accidentally grabbed a stack of the coordinating envelopes instead. That's when the light bulb went on and I decided to try making a card out of.....an envelope.

Here's how:

After carefully opening up the envelope and trimming off edges with remnants of adhesive, I opening it up flat on my stamping table.  Then I stamped the hummingbird and lily cluster on the left panel, using Clearsnap Wicked Black Archival ink, as shown:


I continued stamping lily clusters and other floral elements from the set as shown:


Next I stamped another one of my new phrase stamps (Bird Sings)...inside the center panel of the card...


Next step was to color the images using a combination of Derwent watercolor pencils and markers. 


I loved the way the colors harmonized so well but...it just needed a finishing touch.  I wanted to keep it simple so I added a simple gold trim on the underside of the left panel and a simple pink cord along the edge on top .  Beacon's Fabri-tac Adhesive made it super easy!


This Hummingbird set can be used in SO many different ways...this is just one of them. 


Here is the finished project!!!


Monday, April 15, 2019

Happy Spring....or is it still Winter????

The past 6 months have literally been a blur.  Winter made its unwelcome appearance by very early November here in Chicagoland. And, like an unwelcome guest that was only supposed to be visiting a few weeks, Old Man Winter just WILL NOT leave!  In fact, just yesterday we had a significant snowstorm!  Yes, several inches of wet, heavy messy SNOW on April 14! 


Poor Ollie couldn't figure out where his beautiful green world had gone.  Again....


 Meanwhile, we are looking forward now for Spring's arrival.  (She is running SO late....)  Hoping we can finally send Winter packing until next year! I actually sense Spring is finally arriving because now I'm starting to sneeze....and Spring ALWAYS brings allergies with her.....)