But...once in a while a creative opportunity comes along that has little or nothing to do with stamping, inky techniques or even paper. Unless it involves materials I cannot use because I'm chemically sensitive--and, of course, sharing my environment with my parrot, Ollie-- it is hard to pass up the fun of learning new crafts and trying something I've never done before.
I was recently asked to join the etchall Ambassador team...and I jumped at the chance! I was a tiny bit hesitant at first, but I can now confidently say I have etched glass....and it was SUPER EASY to do!
The process is quick...and results are AMAZING! The most important things to remember are (1) think though your project so you know what you want to accomplish, (2) prepare for each step by having all necessary materials gathered and ready, and (3) test the etching creme in an inconspicuous spot before beginning the project to make sure the glass is the kind that can be etched. It is literally THAT easy!
For my first project, I decided to repurpose a glass pickle jar so I can prep and serve my own pickled cucumbers, beans or other veggies.
Here's how:
1. Wash the jar thoroughly with dishwashing liquid, rinse and dry with a clean towel. I was extra careful so I also cleaned the glass surface with a cotton ball dipped in rubbing alcohol right before I began the project.
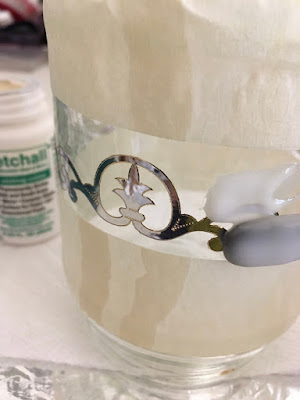
2. Instead of using a cutting machine and adhesive sticker paper to create my own stencil design, I decided to use masking tape plus metallic border stickers I already had in my craft stash.
3. I wrapped the stickers and masking tape around the jar as shown.
4. The jar circumference was larger than the length of the sticker so I cut another smaller piece and added it into the gap.
5. Once I burnished everything securely onto the glass, it was time to apply the etchall creme.
It is meant to be applied generously with a little spatula that comes with it.
6. Once the creme was applied, I set my timer for 15 minutes. I actually wound up with a phone call that extended my time to 22 minutes but that was no big deal. The etchall creme won't etch too much if it sits a little longer. It just needs a minimum of 15 minutes.
The cool thing was I could actually see the results of the etching process by the time the timer rang!
7. Next I removed the creme from the jar. Yes! No waste because the creme is RE-USABLE! How cool is that?! So I used my little handy dandy spatula, scooped off as much of the creme as possible and slid it off into the jar to use for another project in the near future.
8. After that, I rinsed remaining creme off the jar in a plastic bowl filled with clean water. One thing to remember is the etching creme will etch anything glass (like fiberglass) and porcelain, but won't affect plastic. So I had my rinse bowl already set up and ready to go.
9. Last step is to remove all the stickers and tape. A little sticky residue remained but I cleaned that off with a little abrasive sponge afterward.
SO EASY! Go check out the etchall website for more information, videos, tutorials, projects...and all the cool etching products and possibilities!
Until next time....


